A π-estimating Twitter bot: Part III

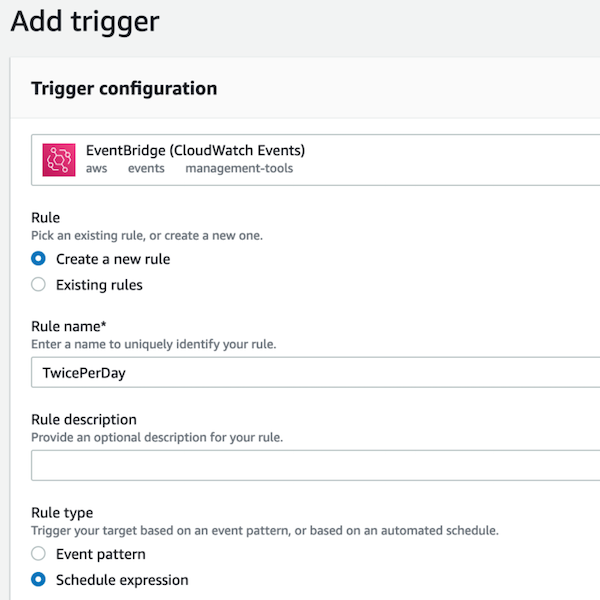
In the final part of this three-part series, I’ll give technical step-by-step instructions for how to wire up our Twitter bot, @BotfonsNeedles, to Docker and deploy it on the free tier of AWS Lambda, so that it can run until the end of time. I’ll also include some tips that I wish I knew when I got started.

If you’d like to make a Twitter bot, but find this guide intimidating, you can fork the repository and follow the README on the GitHub page for my other bot, @oeisTriangles. Or better yet, I would love to set up a call and walk you through it step-by-step! Just let me know on Twitter.

The plan

And in this final part, we will

  • build and run a Docker image so that you can run it on a local server,
  • push the Docker image up to Amazon Elastic Container Registry (ECR),
  • hook up the Docker image to an AWS Lambda function, and
  • configure the function to run on a timer in perpetuity.
My Twitter bot, @RobotWalks, deployed using the techniques in this article.
My Twitter bot, @xorTriangles, which posts every 12 hours via AWS Lambda.

Turn it into a Docker image

Next, we’ll package this up in a Docker image so that AWS Lambda has everything that it needs to run this function. Begin by downloading Docker if you don’t already have it installed.

Next, we’re going to add a new file called Dockerfile from an AWS base image for Python, which will look like this.

FROM amazon/aws-lambda-python:3.8

RUN pip install tweepy
RUN pip install Pillow -t .

COPY random_needle.py ./
COPY needle_drawer.py ./
COPY secrets.py ./
COPY twitter_accessor.py ./
COPY tweet_builder.py ./
COPY app.py ./

CMD ["app.handler"]
  • The FROM line says that we’re going to use an Amazon Linux box that has been pre-configured to have Python 3.8.
  • The RUN lines help us to install the Python libraries that we need.
  • The COPY lines say to move the corresponding files from the local directory to the current directory (./) of the Linux box.
  • The CMD line says that when you talk to the server, it should respond with the handler function from the app.py file.

Building a Docker image

Now, we’re going to build the Docker image. Make sure you’re in the proper directory and name the bot botfons-needles (or something else you’d like) by running the following command in the directory containing your Dockerfile:

docker build -t botfons-needles .

This command will probably take a while to run. It’s downloading everything to make a little Linux box that can run Python 3.8, and doing some additional tasks as specified by your Dockerfile. Once this process is done, set up a local server (on port 9000) for the bot where you can test it out by running

docker run -p 9000:8080 botfons-needles

In order to test your code, run the following cURL command in a new terminal:

curl -XPOST "http://localhost:9000/2015-03-31/functions/function/invocations" -d '{}'

If everything works, you’re ready to move on to the next step. More likely, something is a little off, and you’ll want to stop the server, and rebuild the image. To do this, find the name of the local server with

docker container ls

which will return a CONTAINER ID such as bb81431991sb. You can use this ID to stop the container, remove the container, and remove the image.

$ docker stop bb81431991sb
$ docker rm bb81431991sb
$ docker image rm botfons-needles

Then make your changes, and start again from the docker build step.

My first Twitter bot, @oeisTriangles. Read about this in my blog post, “Parity Bitmaps from the OEIS“.

Push to Amazon ECR

In this step, we’ll push our Docker image up to Amazon. So go to Amazon ECR, log in or create an account, navigate to the ECR console, and select “Create repository” in the upper right-hand corner.

This will bring up a place for you to create a repository name.

Now once there’s a repository available, we’re ready to push our local copy up. Start by downloading the AWS Command Line Interface and logging in to AWS. Notice that there are *two* references to the server location (us-east-1) and one reference to your account number (123456789).

aws ecr get-login-password --region us-east-1 \
| docker login --username AWS \
  --password-stdin 123456789.dkr.ecr.us-east-1.amazonaws.com

Now all you need to do is tag your docker image and push it up. Get your Docker image ID with docker image ls, and (supposing it’s 1111111111), tag it with the following command (again, making sure to specify the right server location and account number):

docker tag 1111111111 123456789.dkr.ecr.us-east-1.amazonaws.com/botfons-needles

Now you’re ready to push! Simply change 123456789 to your account number and us-east-1 to your server location in the following command and run it:

docker push 123456789.dkr.ecr.us-east-1.amazonaws.com/botfons-needles

Hook up to AWS Lambda

Now you’re ready to wire this up to a AWS Lambda function! Start by going to the AWS Lambda console and click “Create function”

To create a function from the AWS Lambda console, click “Create function” in the upper right-hand corner.

This will take you to a page where you’ll want to select the third option “Container image” at the top, give your function a name (e.g. myTwitterBot) and select the Container image URI by clicking “Browse images” and selecting the Docker image you pushed up.

Search for the image you just pushed up, choose the latest tag, and “Select image”.

Then the dialog will go away, and you can click “Create function”, after which your function will start to build—although it may take a while!

Next, you’ll want to test your function to make sure that it’s able to post to Twitter properly!

With the default RAM and time limit, it’s likely to time out. If the only thing that you’re using AWS for is posting this Twitter bot, then it doesn’t hurt to go to the “Configuration” tab and increase the memory and timeout under “General configuration”. (I usually increase Memory to 1024 MB and Timeout to 15 seconds, which has always been more than enough for me.)

Increase memory to 1024 MB and timeout to 15 seconds.

Run it on a timer

If things are running smoothly, then all that’s left to do is to set up a trigger. Do this by selecting “Triggers” in the “Configuration” tab, clicking “Add Trigger”, selecting “EventBridge (CloudWatch Events)”, and making a new rule with schedule expression rate(12 hours).

That’s it! AWS Lambda should trigger your bot on the interval you specified!

There’s only one step left: send me a message or tag me on Twitter @PeterKagey so that I can follow your new bot!

A π-estimating Twitter bot: Part II

This is the second part of a three part series about making the Twitter bot @BotfonsNeedles. Click here for Part I.

In this part, I’ll explain how to use the Twitter API to

  • post the images to Twitter via the Python library Tweepy, and
  • keep track of all of the Tweets to get an increasingly accurate estimate of 𝜋.

In the next part, I’ll explain how to

  • Package all of this code up into a Docker container
  • Push the Docker image to Amazon Web Services (AWS)
  • Set up a function on AWS Lambda to run the code on a timer

Get access to the Twitter API

When I made my first Twitter bot, I followed the article “How to Make a Twitter Bot With Python“.

In order to have your Python code post to your Twitter feed, you’ll need to register for a Twitter developer account, which you can do by going to https://developer.twitter.com/ and clicking apply. You’ll need to link the account to a phone number and fill out a few minutes of forms. For all four of my bots, (@oeisTriangles, @xorTriangles, @RobotWalks, and this bot) I’ve been approved right away.

Keep in mind that you can only use your phone number on two Twitter accounts—so you’ll have to use a Google Voice number or something else if you want to make more than two bots.

Once you’re approved, go to the Developer Portal, click on the Projects & Apps Overview, and click on the blue “+ New Project” button. You will be given a series of short questions, but what you submit isn’t too important.

Create a new project by clicking “+ New Project” via the Projects & Apps overview

Getting the API Keys

Once you’ve filled out the form, you should be sent to a page with an API Key and API Secret Key. This is essentially the password to your account, so don’t share these values.

A screenshot showing a (fake) API Key and API Secret Key.

We’re going to take these values and place them in a new file called secrets.py, which will look like this:

API_KEY        = "3x4MP1e4P1kEy"
API_SECRET_KEY = "5Ecr3TK3Y3x4MP1e4P1kEytH150nEi510nG"

Getting the Access Token

Once we close the API Key dialog, we’ll need to update our app to allow us to both read and write. We can do this by clicking on the gear to access our projects “App settings”.

Click the gear to access the settings.

Once you’re in, you’ll want to edit the App permissions to “Read and Write”.

Click “Edit” to update from “Read Only” to “Read and Write”.

Then go to the “Keys and Tokens” page (which you can do by clicking the key icon from the app settings page), and generate an Access Token and Secret.

Click “Generate” to make an access token and secret.

When you click “Generate” you should get an Access Token and a Access Token Secret, which you need to add to your secrets.py file.

Thus your secrets.py file should contain four lines:

API_KEY             = "3x4MP1e4P1kEy"
API_SECRET_KEY      = "5Ecr3TK3Y3x4MP1e4P1kEytH150nEi510nG"
ACCESS_TOKEN        = "202104251234567890-exTrAacC3551Nf0"
ACCESS_TOKEN_SECRET = "5eCr3t0KEnGibB3r15h"

hello_twitter.py

Next, we’ll hook this up to the Twitter API via tweepy, which I’ll install in the terminal using pip:

$ pip3 install tweepy

And make a file called twitter_accessor.py that looks exactly like this:

from secrets import *
import tweepy

class TwitterAccessor:
  def __init__(self):
    auth = tweepy.OAuthHandler(API_KEY, API_SECRET_KEY)
    auth.set_access_token(ACCESS_TOKEN, ACCESS_TOKEN_SECRET)
    self.api = tweepy.API(auth)

  def read_last_tweet(self):
    timeline = self.api.user_timeline(count=1, exclude_replies=True, tweet_mode='extended')
    return timeline[0].full_text

Next, we’ll check that everything is working by making a file called hello_twitter.py:

from twitter_accessor import TwitterAccessor

new_status = "Hello Twitter!"
TwitterAccessor().api.update_status(new_status)
print("Posted status: '" + new_status + "'")

Run it via the command line:

$ python3 hello_twitter.py

If something looks broken, try to fix it. (If it’s broken because of something I’ve said, let me know.)

Reading and writing Tweets

Now you can delete your hello_twitter.py file, because we’re about to do this for real! In part 3, we’re going to wire this up to AWS Lambda, which has certain preferences for how we structure things. With this in mind, I’d recommend following my naming conventions, unless you have a reason not to.

Each Tweet should have copy that looks like this:

This trial dropped 100 needles, 59 of which crossed a line. This estimates π ≈ 2*(100/59) ≈ 3.38, an error of 7.90%.

In total, 374 of 600 needles have crossed a line.
This estimates π ≈ 3.20, an error of 2.13%.

BotfonsNeedles should parse the “374 of 600”, throw 100 more needles, and report on the updated estimate of \(\pi\).

An implementation

I’ve made a file called tweet_builder.py, with five functions:

  • pi_digits_difference takes an estimate of \(\pi\) and outputs an appropriate length string. For example, if the estimate is \(3.14192919\), then it will output "3.14192", which are all of the correct digits, plus the first two that are wrong. If the estimate is \(3.20523\), then it will output “3.20".
  • error_estimate takes an estimate of \(\pi\) and computes the right number of digits to show in its percent error. For example, if the estimate is \(3.20523\) (which is \(2.0256396\%\) too big) then it will output "2.02%".
  • get_running_estimate uses the API in TwitterAccessor to look up the last tweet—then throws some needles, and outputs both the total number of needles tossed and the total number of needles that cross a line.
  • tweet_copy takes the information from get_running_estimate, formats it with pi_digits_distance and error_estimate and writes the text for the tweet.
  • post_tweet uses the API in TwitterAccessor to send the tweet to Twitter, with an image to match.

Most of these implementations are just details which can be found on Github, but I want to highlight post_tweet, the function that is likely to be the most relevant to you.

def post_tweet(self):
  file_name = self.drawer.draw_image()
  copy = self.tweet_copy()
  self.accessor.api.update_with_media(filename=file_name, status=copy)
  return copy

What’s next

In Part III, we’ll get this running in a Docker container and have it run on AWS Lambda.

If you want to get a head start, make a file called app.py with a function called handler, which AWS Lambda will call. This function should return a string, which will get logged.

from tweet_builder import TweetBuilder

def handler(event, context):
  return TweetBuilder().post_tweet()

As usual, if you have any questions or ideas, there’s nothing I love more than collaborating. If you want help getting your bot off the ground, ask me about it on Twitter, @PeterKagey!

A π-estimating Twitter bot: Part I

This is the first part of a three part series about making the Twitter bot @BotfonsNeedles. In this part, I will write a Python 3 program that

In the second part, I’ll explain how to use the Twitter API to

  • post the images to Twitter via the Python library Tweepy, and
  • keep track of all of the Tweets to get an increasingly accurate estimate of \(\pi\).

In the third part, I’ll explain how to

  • Package all of this code up into a Docker container
  • Push the Docker image to Amazon Web Services (AWS)
  • Set up a function on AWS Lambda to run the code on a timer
An example of dropping 100 needles in Buffon’s needle problem. Needles that cross a vertical line are colored red.

Buffon’s needle problem

Buffon’s needle problem is a surprising way of computing \(\pi\). It says that if you throw \(n\) needles of length \(\ell\) randomly onto a floor that has parallel lines that are a distance of \(\ell\) apart, then the expected number of needles that cross a line is \(\frac{2n}\pi\). Therefore one way to approximate (\pi) is to divide \(2n\) by the number of needles that cross a line.

I had my computer simulate 400 needle tosses, and 258 of them crossed a line. Thus this experiment approximates \(\pi \approx 2\!\left(\frac{400}{258}\right) \approx 3.101\), about a 1.3% error from the true value.

63/100 needles cross a vertical line; approximates \(\pi \approx 200/63 \approx 3.174\).
61/100 needles cross a vertical line; approximates \(\pi \approx 200/61 \approx 3.279\).
68/100 needles cross a vertical line; approximates \(\pi \approx 200/68 \approx 2.941\).
66/100 needles cross a vertical line; approximates \(\pi \approx 200/66 \approx 3.030\).

Modeling in Python

Our goal is to write a Python program that can simulate tossing needles on the floor both numerically (e.g. “258 of 400 needles crossed a line”) and graphically (i.e. creates the PNG images like in the above example).

The RandomNeedle class.

We’ll start by defining a RandomNeedle class which takes

  • a canvas_width, \(w\);
  • a canvas_height, \(h\);
  • and a line_spacing, \(\ell\).

It then initializes by choosing a random angle (\theta \in [0,\pi]) and random placement for the center of the needle in \[(x,y) \in \left[\frac{\ell}{2}, w -\,\frac{\ell}{2}\right] \times \left[\frac{\ell}{2}, h -\,\frac{\ell}{2}\right]\] in order to avoid issues with boundary conditions.

Next, it uses the angle and some plane geometry to compute the endpoints of the needle: \[\begin{bmatrix}x\\y\end{bmatrix} \pm \frac{\ell}{2}\begin{bmatrix}\cos(\theta)\\ \sin(\theta)\end{bmatrix}.\]

The class’s first method is crosses_line, which checks to see that the \(x\)-values at either end of the needle are in different “sections”. Since we know that the parallel lines occur at all multiples of \(\ell\), we can just check that \[\left\lfloor\frac{x_\text{start}}{\ell}\right\rfloor \neq \left\lfloor\frac{x_\text{end}}{\ell}\right\rfloor.\]

The class’s second method is draw which takes a drawing_context via Pillow and simply draws a line.

import math
import random

class RandomNeedle:
  def __init__(self, canvas_width, canvas_height, line_spacing):
    theta = random.random()*math.pi
    half_needle = line_spacing//2
    self.x = random.randint(half_needle, canvas_width-half_needle)
    self.y = random.randint(half_needle, canvas_height-half_needle)
    self.del_x = half_needle * math.cos(theta)
    self.del_y = half_needle * math.sin(theta)
    self.spacing = line_spacing

  def crosses_line(self):
    initial_sector = (self.x - self.del_x)//self.spacing
    terminal_sector = (self.x + self.del_x)//self.spacing
    return abs(initial_sector - terminal_sector) == 1

  def draw(self, drawing_context):
    color = "red" if self.crosses_line() else "grey"
    initial_point  = (self.x-self.del_x, self.y-self.del_y)
    terminal_point = (self.x+self.del_x, self.y+self.del_y)
    drawing_context.line([initial_point, terminal_point], color, 10)

By generating \(100\,000\) instances of the RandomNeedle class, and keeping a running estimation of (\pi) based on what percentage of the needles cross the line, you get a plot like the following:

This estimates \(\pi\approx 2\left(\frac{10000}{63681}\right) \approx 3.1407\) an error of 0.03%.

The NeedleDrawer class

The NeedleDrawer class is all about running these simulations and drawing pictures of them. In order to draw the images, we use the Python library Pillow which I installed by running

pip3 install Pillow

When an instance of the NeedleDrawer class is initialized, makes a “floor” and “tosses” 100 needles (by creating 100 instances of the RandomNeedle class).

The main function in this class is draw_image, which makes a \(4096 \times 2048\) pixel canvas, draws the vertical lines, then draws each of the RandomNeedle instances.

(It saves the files to the /tmp directory in root because that’s the only place we can write file to our Docker instance on AWS Lambda, which will be a step in part 2 of this series.)

from PIL import Image, ImageDraw
from random_needle import RandomNeedle

class NeedleDrawer:
  def __init__(self):
    self.width   = 4096
    self.height  = 2048
    self.spacing = 256
    self.random_needles = self.toss_needles(100)

  def draw_vertical_lines(self):
    for x in range(self.spacing, self.width, self.spacing):
      self.drawing_context.line([(x,0),(x,self.height)],width=10, fill="black")

  def toss_needles(self, count):
    return [RandomNeedle(self.width, self.height, self.spacing) for _ in range(count)]
 
  def draw_needles(self):
    for needle in self.random_needles:
      needle.draw(self.drawing_context)

  def count_needles(self):
    cross_count = sum(1 for n in self.random_needles if n.crosses_line())
    return (cross_count, len(self.random_needles))

  def draw_image(self):
    img = Image.new("RGB", (self.width, self.height), (255,255,255))
    self.drawing_context = ImageDraw.Draw(img)
    self.draw_vertical_lines()
    self.draw_needles()
    del self.drawing_context
    img.save("/tmp/needle_drop.png")
    return self.count_needles()

Next Steps

In the next part of this series, we’re going to add a new class that uses the Twitter API to post needle-drop experiments to Twitter. In the final part of the series, we’ll wire this up to AWS Lambda to post to Twitter on a timer.

Parity Bitmaps from the OEIS

My friend Alec Jones and I wrote a Python script that takes a two-dimensional sequence in the On-Line Encyclopedia of Integer Sequences and uses it to create a one-bit-per-pixel (1BPP) “parity bitmaps“. The program is simple: it colors a given pixel is black or white depending on whether the corresponding value is even or odd.

A048152 Parity Bitmap
A048152 parity bitmap, rescaled through Lospec’s Pixel Art Scaler.
A207409 parity bitmap
A207409 parity bitmap.

An Unexpected Fractal

We’ve now run the script on over a thousand sequences, but we still both agree on our favorite: the fractal generated by OEIS sequence A279212.

Fill an array by antidiagonals upwards; in the top left cell enter \(a(0)=1\); thereafter, in the \(n\)-th cell, enter the sum of the entries of those earlier cells that can be “seen” from that cell.

Notice that in the images below, increasing the rows and columns by a factor of \(2^n\) seems to increase the “resolution”, because the parity bitmap is self similar at 2x the scale. We still don’t have a good explanation for why we’d expect these images are fractals. If you know, please answer our question about it on Math Stack Exchange. (Alec and I have generated these images up to 16384 × 32768 resolution, roughly 536 megapixels.)

A279212 parity bitmap
512 rows and 256 columns of A279212.
A279212 parity bitmap
2048 rows and 1024 columns of A279212.

The Construction of the Sequence

The sequence is built up by “antidiagonals”, as shown in the GIF below. In the definition, “seen” means every direction a chess queen can move that already has numbers written down (i.e. north, west, northwest, or southwest). That is, look at all of the positions you can move to, add them all up, write that number in your square, move to the next square, and repeat. (The number in cell \(C\) also counts the number of paths a queen can make from \(C\) to the northwest corner using only N, NW, W, SW moves.)

Animation of A279212 construction

(Interestingly, but only tangentially related: Code Golf Stack Exchange User flawr noticed that the number of north/west rook walks is related to the number of ways of partitioning a \(1 \times n\) grid into triangles.)

Parity Bitmaps for Other Sequences

It’s worth noting that many sequences are all black, consist of simple repeating patterns, or look like static. However, chess-type constructions, as illustrated by the GIF above, the one above yield images that look like the Sierpiński triangle. (See A132439 and A334017 below, and look at A334016 and A334745 via their OEIS entries.) Look below for a couple other sequences with interesting images too.

A132439 parity bitmap.
A301851 parity bitmap.
A334017 parity bitmap.
A237620 parity bitmap.

I ordered a poster-sized print of the A279212 fractal for Alec, and he framed it in his office.

Alec’s fractal, framed above his fountain pen ink and tasteful books.

Some ideas for further exploration: